 |
Well-defined gardens and orderly blooms give a lovely, landscaped appearance to any yard. With the use of decorative edging, it is easier than ever to create solid boundaries between your lawn and garden, and also maintain a freshly groomed look at all times. In addition to creating a neat appearance, edging prevents soil and mulch from spilling onto your lawn. It also keeps driveway gravel out of your flower beds and prevents grass from growing into garden areas, reducing the amount of time you need to spend weeding. |
If you are looking to add both definition and design to your landscape, edging is available in a variety of materials, styles and colors. Edging will not only improve how your yard looks, it will also reduce the time you spend maintaining it. Before you buy edging, consider the following questions:
• Is it important that the edging be easy to install?
• What is your estimated budget for edging?
• How do you install different types of edging?
• Do you live in an area that experiences temperature extremes?
• Are you trying to create a straight or curved border?
Spade-Cut, Strip, Masonry and Wood Edging
There are several different types of edging available. The four main types include spade-cut, strip edging, masonry and wood edging. Look around your yard and choose a material that aesthetically matches the design and style of your outdoor space. Each edging material has advantages and some varieties are better suited to certain climates.The main difference between each material, however, is budget and appearance. The least expensive, most commonly used material is plastic edging. One of the most attractive and most expensive types is rock or stone. Each type also varies slightly in how it is installed.
Spade-Cut Edging
For the simplest type of border, choose spade-cut edging. Spade-cut edging involves digging a narrow trench around the outside of the bed you are setting apart. This elegant edging was once used in the renowned English gardens. Spade-cut edging works well in most yards, regardless of the slope or the size of the area. Occasional maintenance involves weed removal and keeping soil out of the trench.• Use a flat spade with a straight cutting edge to get the job done
• Spade-cut edging is the least expensive type of edging available
• Keep the spade's cutting blade sharp for a crisper edge with less effort
• Use leftover soil in your compost pile or in the bed you are edging
• To keep the edge looking fresh, recut once or twice per season
Strip Edging
Strip edging consists of a shallow barrier that is anchored beneath the ground. The very top part of the edging is visible to subtly set the bed and lawn apart. Strip edging works best for creating curves and comes in plastic and metal varieties. Plastic is less expensive and easier to install.Metal edging comes in steel or aluminum and lasts longer but is less pliable. In cold climates, where the ground heaves regularly due to frost, strip edging can dislodge so you may need to occasionally reinstall it.
• Plastic edging is pliable and won't usually crack in heat or cold
• Plastic edging is more resistant to ground heaves than metal
• Metal edging may be painted and is often used by professionals
• Compared to steel edging, aluminum is lighter and does not rust
• Metal edging is more expensive than plastic but lasts a long time
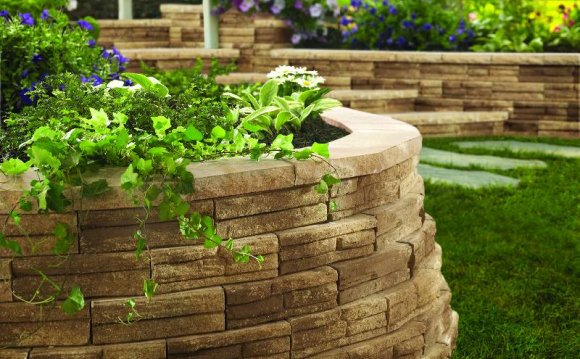
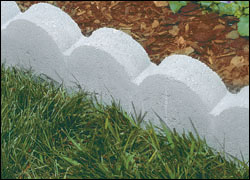
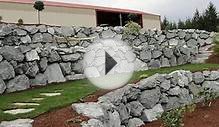
Masonry Edging
Masonry edging, composed of stone, brick or concrete, is the most expensive type. Stone is very attractive and allows you to match borders to any existing stonework you have used in the landscaping, garden or exterior of your home. You can stand brick on end or lay it flat so it's easier to mow over, or you can mortar the bricks for a traditional look. Cement or brick pavers are less expensive. Cement borders often come in preformed sections of different shapes and styles, allowing for easier installation.• Weeds can grow quickly between stone and brick edging
• Edging made from stone, brick or concrete is extremely durable
• Interlocking pavers provide a tight fit without needing mortar
• Brick is available in a range of textures and colors
• You can create patterns and curves with concrete edger's
Wood Edging
Wood edging comes in precut sections of alternating heights, either as round logs or flat boards. This type of edging is usually either pre stained or pressure treated for convenience. You can also use large landscape timbers or railroad ties. All types of wood edging are durable and most are affordable. The types of wood most often used include cedar, cypress and redwood, which resist rot naturally when lying next to soil.If these types of wood are too expensive, opt for pressure-treated wood, which stands up well to rot. Try landscaping timbers in an area where the border must resist pressure from surrounding soil, such as on a hill.
• Wood edging is relatively inexpensive and is very durable
• Pressure-treated wood will not harm soil or plants
• Wood edging is sold as 1–x 4–inch or 1– x 6–inch boards, set on edge in the soil
• Use timbers to outline straight beds or stack to create a raised bed
• Timbers come in a variety of cross-sectional lengths and dimensions
Installation
For tips on how to install the various types of edging that are available, consult the chart below.
Edging Type |
Installation Tips |
|---|---|
| Masonry: Brick | • Dig a trench that will allow the amount of brick you want showing to be seen
• For vertical edging, set the brick edge-to-edge in the trench • For horizontal edging, lay the bricks on a sand base to cushion them and protect from frost heave • Keep top faces flush with soil surface and add or take sand away to allow for variations in thickness • Push soil up against bricks • Sweep sand into gaps between bricks to add stability |
| Masonry: Stone | • Dig a trench that will allow the amount of stone you want to show
• Drive two stakes to define the area you are filling and run a mason's line of string between to define the area • After mixing concrete, shovel into a 3 -foot stretch and smooth out • Set stones into concrete • Level the tops to match the masonry line using a rubber mallet • When all stones are in place, push concrete about 6-inches up the back side of each and trowel smooth at a 45 degree angle • For corners, keep stone faces tight to each other and always end a row with a full stone • Repeat steps for the rest of the border |
| Spade-Cut | • Outline the area with rope, a garden hose, lime or other material
• Dig a trench that's 3-inch to 4–inch deep • Keep the lawn edge vertical and angle the inside of the trench toward the bed • For loose soil, angle the spade rather than cutting straight up and down • After cutting the perimeter, rake the trench and pull leftover soil up into the bed |
| Strip: Metal | • Outline the area with rope, a garden hose, lime or other material
• If soil is soft, lay edging along the bed's border and, using a board to muffle the blow, tap into place with a hammer • If soil is hard, use a spade to dig a shallow 4-inch trench around the bed's perimeter • Position the top edge of the metal at soil level • Drive enclosed stakes through premade holes in the strips or by driving long, bent spikes over the strips to keep edging in place • On the garden side, rake soil against the edging, keeping it a bit lower than |
YOU MIGHT ALSO LIKE

How to Install a Rigid Liner - The Home Depot

backyard landscape design program
Landscaping Rocks Ideas | Rock Landscape Design Ideas Romance
Share this Post
latest post
-
 Landscape Design articles February 3, 2017
 -
 House Garden Landscape Design January 26, 2016
 -
 Waterfall Landscape Design January 4, 2017
 -
 Modern Landscaping Design December 24, 2015
 -
 Landscaping Garden Design June 13, 2016
 -
 Hospital Landscape Design July 11, 2018
 -
 Landscape Design Program for Mac April 7, 2017
 -
 Landscape Design New York December 4, 2017
 -
 Adelaide Landscape Designers March 5, 2017